Cinnabons are delicious to eat, but looking at them it seems almost impossible to make your own cinnabons. You will be surprised to see how easy it actually is. I set out to make our own over the weekend. I asked my daughter to help…. you know some bonding time 🥰 The weekend before we baked our all time favorite cookies http://www.livingdelish.com/everything-but-the-kitchen-sink-cookies/
We have been busy 😉 I just love baking!!
Look it does take some time to make these. Since you are working with yeast you need time in between kneading to allow the dough to rise, after each hour or two of rising you need to knock down the dough and allow the dough to rise again. Do not take shortcuts here. By allowing your dough to rise and be knocked down you are helping the dough to become softer and more elastic. In the end the baked goods will be light and fluffy.
This recipe made around 18 Cinnabons, each around +/- 10 -15 cm in diameter. I made these in cupcake holders. But you can really just bake them directly in your well greased muffin tins. The cupcake holders is really not necessary.
*TIP* This recipe calls for brown caster sugar. You can easy make your own by using a food processor or blender. Pulse it until it reached fine consistency.

Rolled out Dough 
create a swirl 
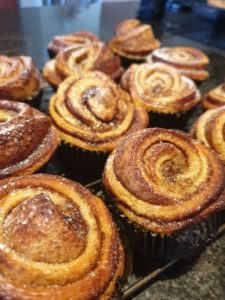
In Muffin trays
Make your own Cinnabons
Makes 18 Cinnabons, each around +/- 10 -15 cm in diameter
Ingredients
150 g Butter, Cut into small blocks
500 ml milk
800 g Plain white flour
½ teaspoon of salt
7 g packet of fast-action yeast
100 g caster sugar
1 egg
Brown sugar for sprinkling
Filling:
75 g butter
2 table spoons ground Cinnamon
75 g brown caster sugar (make your own. See tip above)
Directions
Start by heating the milk and the butter in a microwavable jug. Do not boil the milk only heat the milk enough for the butter to melt. Set aside.
Add the flour, salt, yeast and caster sugar in a large bowl, or your mixer’s bowl if you are using a stand mixer. Make a well in the center of the flour and pour in the milk mixture. Use a wooden spoon to mix everything together. If you are using a stand mixer, Use your dough hook and start to knead the dough until its is silky and elastic. This will take around 5 – 10 minutes.
If you are kneading by hand, turn your dough out on a lightly floured surface and knead the dough until soft, silky and elastic. This will take a bit longer around 10 -15 minutes.
Cover the dough with a greased piece of cling wrap and set aside to rest for around 2 hours.
In the meantime make the filling
Start by melting 25 g of the filling butter in a microwavable bowl. Once melted add the remainder of the butter, cinnamon and sugar to the bowl. Now mix with a spoon until smooth. It should be easy to smear. Set this aside for later.
Rolling the dough
Cover your table with a large piece of baking paper or cling wrap. Sprinkle flour on top of this. Using a floured rolling pin, roll the dough out into a large rectangular shape and to about the thickness of around ½ cm.
Using a palette knife spread the filling over the rolled out dough. Make sure to cover it evenly and right to the edges of the dough.
Once done, lift the long side edge of the baking paper or cling wrap and carefully lift the dough over, this will create a swirl, this is the same action you will use when you make a swissroll. Keep rolling your dough up until everything is rolled.
Using a sharp knife, cur the roll into +/-2 cm thick slices. Carefully lift each slice up and place them into the well greased muffin tray.
Beat the egg with a fork and using a pastry brush paint each roll with the egg. Sprinkle with some Brown sugar.
Cover the swirls with creased cling wrap and place them in a warm area for around 1 hour. Towards the end of the rising time heat your oven to 180˚C.
Carefully remove the cling wrap and place the muffin trays into the oven. Bake for around 8 – 10 minutes, or until golden brown.
Remove from the oven and allow the swirls to coll off on a cooling rack.
ENJOY!!